AuditpolCIS – Automating Windows SIEM CIS Benchmarks Testing

In the previous post on the subject of Windows SIEM, we covered the CIS benchmarks for Windows Auditing Policy in a spreadsheet, which was provided freely (really, actually free).

This week we introduce a python open source tool we have developed, to automate the CIS Benchmark testing.

Download AuditpolCIS

Meeting Regulatory / Compliance / Audit Requirements

The automated assessment results from AuditpolCIS, as it’s based on CIS Benchmarks, helps in the support of meeting audit requirements for a number of programs, not least PCI-DSS:

  • Audit account logon events: Helps in monitoring and logging all attempts to authenticate user credentials (PCI-DSS Requirement 10.2.4).
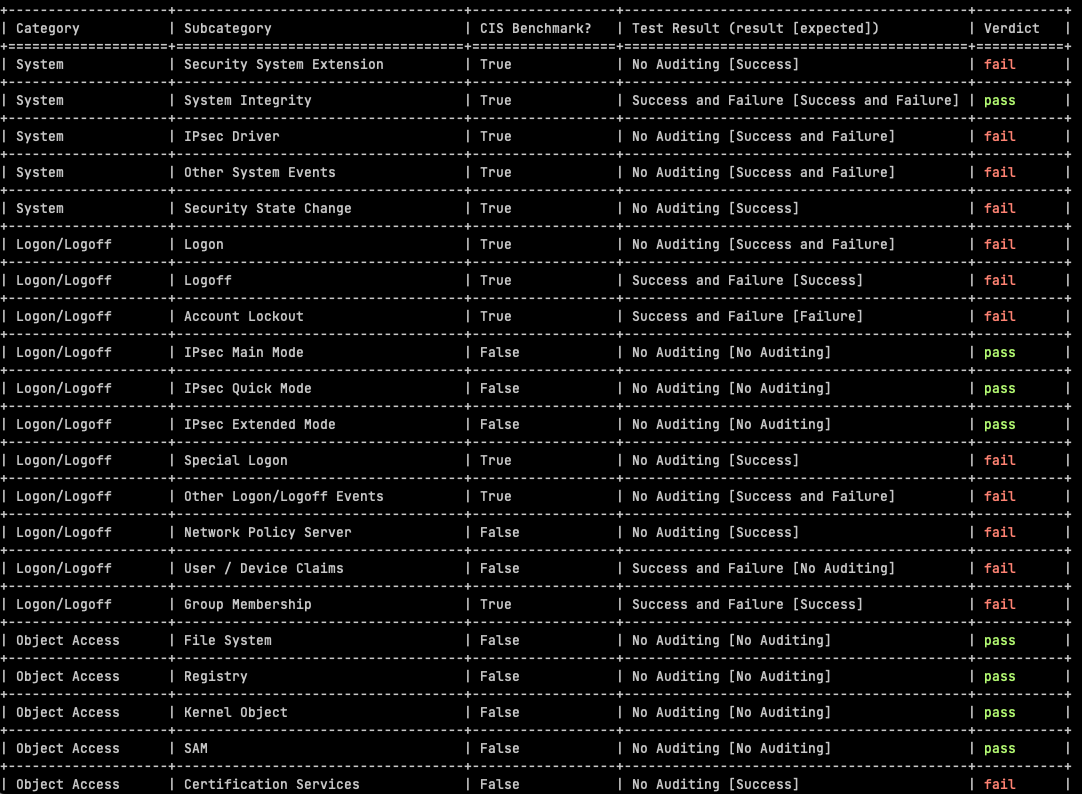
  • Audit object access: Monitors access to objects like files, folders, and registry keys that store cardholder data (PCI-DSS Requirement 10.2.1).
  • Audit privilege use: Logs any event where a user exercises a user right or privilege (PCI-DSS Requirement 10.2.2).
  • Local log files sizes and retention policies are useful in assessing compliance with e.g. 5.3.4 and 10.5.1 requirements (PCI-DSS 4). There should be a block of text after the audit policy results.

Usage / Setup

First you will to set up a Python Virtual Environment. Ensure that you have Python installed on your system (Python 3.10 was used in development). If not, download and install Python from the official website: https://www.python.org/downloads/

Open a Command Prompt or terminal window and navigate to the folder where you extracted the AuditpolCIS project.

Run the following command to create a new virtual environment:

python -m venv venv

Activate the virtual environment by running:

For Windows:

venv\Scripts\activate

For macOS/Linux:

source venv/bin/activate

Install the required Python packages from the requirements.txt file by running:

pip install -r requirements.txt

You will need a .env file in your project root. The contents relate to the target you wish to test:

HOSTNAME='<Windows box IP address or host name>'
USERNAME='<Windows user account name>'
PASSWORD='<account password>'


Make sure to assign the right ownership and permission on .env. Usually the permissions will be 600.

Once the virtualenv is enabled, you can run the code:

./auditpolcis.py


Feel free to branch or submit a PR.

Additional Points

The CIS benchmarks are based on Windows 2019 Server but they apply to other target varients on a Windows theme. I know none of you will have EOL Windows versions. <Sarcasm engaged>I mean in 22 years of consulting, i’ve never seen any out-of-support warez in critical business usage</Sarcasm engaged>.

Powershell is not required on the target but use of Powershell is also not a crime. Yes, that was a security person who said that.

Sustainability / Use of Regex

I had to use some fairly snazzy regex to pull out Categories (category_pattern = r'^(\w+.*?)(\r)?$') and Subcategories (subcategory_pattern = r'^( {2})([^ ]+.*?)(?=\s{3,})(.*\S)') from the auditpol command output. I did look at more sustainable ways of achieving the same goal, although admittedly i didn’t spend much time doing that. One thing has been clear for a long time with Windows – don’t go looking for registry keys because that can be very painful. Not only is documentation for a key location somewhat thin and erroneous, the key loation also often changes across Windows versions. ChatGPT‘s lack of knowledge of Windows reg keys bears testimony to the previous comments.

So there are two sources of Subcategory names – there is cis-benchmarks.yaml and there is the output of the auditpol /get /category:* command. If there are entries in the YAML file which are not in the auditpol output, they are flagged in the script output, and the same is true vice versa. So if you make spelling mistakes in the excel sheet or YAML file, it will be flagged. It can also happen that auditpol output subcategories do not reflect the CIS Benchmarks subcategories, perhaps with different Windows versions as targets. Any of these categories will be flagged by the script and listed below the pass/fail results.

If you want to change the verdicts or [Sub]Category names, you are of course free to do so. You can edit the cis-benchmarks.yaml file, or edit the included spreadsheet, followed by running the included genyaml.py.

Connection Method

The scripts works over SSH because other types of connection are a pain in the derriere and require you to radically increase your attack surface area, but if there’s a request for e.g. WinRM, please do let me know, or send out a Pull Request. Follow this link for more information about enabling the built-in SSH for Windows.

I know use of AutoAddPolicy with Paramiko in Python is not good form, but also assume that as an admin in the position of someone who performs daily tasks using administrative rights, that you know your hosts. Sometimes security people do get in the way of progress, when there’s low risk issues afoot. Use of RejectPolicy instead of auto-add would be one such case.

Tests Rationalisation

Some of the tests included are not a CIS Benchmark (out of 59 tests, 32 are CIS Benchmarks, whereas 27 are not). It’s not clear why the subcategories were omitted by CIS but anyway – in these cases we have made an assessment based on logging events volume for this subcategory, versus the security value of the subcategory. Most of these are just noise, and in many cases, very high volume noise, so we have advised “No Auditing”.

Customising Test Criteria

The testing template is formed of the YAML file cis-benchmarks.yaml. If you prefer to make changes to the testing template with Excel, the sheet is CIS-Audit-Reqs-Windows2019Server.xlsx in the code root. You can then use the python script genyaml.py to generate a new YAML file (you will need to use the right virtualenv, see above for usage instructions).

Netdelta – Install and Configure

Netdelta is a tool for monitoring networks and flagging alerts upon changes in advertised services. Now – I like Python and especially Django, and around 2014 or so i was asked to setup a facility for monitoring for changes in that organisation’s perimeter. After some considerable digging, i found nada, as in nothing, apart from a few half-baked student projects. So i went off and coded Netdelta, and the world has never been the same since.

I guess when i started with Netdelta i didn’t see it as a solution that would be widely popular because i was under the impression you could just do some basic shell scripting with nmap, and ndiff is specifically designed for delta flagging. However what became apparent at an early stage was that timeouts are a problem. A delta will be flagged when a host or service times out – and this happens a lot, even on a gigabit LAN, and it happens even more in public clouds. I built some analytics into Netdelta that looks back over the scan history and data and makes a call on the likelihood of a false positive (red, amber green).

Most organisations i worked with would benefit from this. One classic example i can think of – a trading house that had been on an aggressive M&A spree, maybe it was Black Friday or…? Anyway – they fired some network engineers and hired some new and cheaper ones, exacerbating what was already a poorly managed perimeter scenario. CISO wanted to know what was going off with these Internet facing subnets – enter Netdelta. Unauthorised changes are a problem! I am directly aware of no fewer than 6 incidents that occurred as a result of exposed SSH, SMB (Wannacry), and more recently RDP, and indirectly aware of many more.

Anyway without further waffle, here’s how you get Netdelta up and running. Warning – there are a few moving parts, but if someone wants it in Docker, let me know.

I always go with Ubuntu. The differences between Linux distros are like the differences between mueslis. My build was on 18.04 but its highly likely 19 variants will be just fine.

apt-get update
apt-get install curl nmap apache2 python3 python3-pip python3-venv rabbitmq-server mysql-server libapache2-mod-wsgi-py3 git
apt-get -y install software-properties-common
add-apt-repository ppa:certbot/certbot
apt-get install -y python-certbot-apache
Clone the repository from github into your <netdelta root> 
git clone https://github.com/SevenStones/netdelta.git

Filesystem

Create the user that will own <netdelta root>

useradd -s /bin/bash -d /home/<user> -m <user>

Create the directory that will host the Netdelta Django project if necessary

Add the user to a suitable group, and strip world permissions from netdelta directories

 groupadd <group> 
 usermod -G  <group> <user>
 usermod -G  <group> www-data
 chown -R www-data:<group> /var/www
 chown -R <user>:<group> <netdelta root> 

Make the logs dir, e.g. /logs, and you will need to modify /nd/netdelta_logger.py to point to this location. Note the celery monitor logs go to /var/log/celery/celery-monitor.log …which of course you can change.

Strip world permissions from all netdelta and apache root dirs:

chmod -Rv o-rwx <web root>
chmod -Rv o-rwx <netdelta root>

Virtualenv

The required packages are in requirements.txt, in the root of the git repo. Your virtualenv build with Python 3 goes approximately like this …

python3 -m venv /path/to/new/virtual/environment

You activate thusly: source </path/to/new/virtual/environment/>/bin/activate

Then suck in the requirements as root, remembering to fix permissions after you do this.

pip3 install wheel
pip3 install -r <netdelta root>/requirements.txt

You can use whatever supported database you like. MySQL is assumed here.

The Python framework mysqlclient was used with earlier versions of Django and MySQL. but with Python 3 and later Django versions, the word on the street is PyMySQL is the way to go. With this though, it took some trickery to get the Django project up and running; in the form of init.py for the project (<netdelta root>/netdelta/.init.py) and adding a few lines …

import pymysql 
pymysql.install_as_MySQLdb()

While in virtualenv, and under your netdelta root, add a superuser for the DF

Patch libnmap

Two main mods to the libnmap in usage with Netdelta were necessary. First, with later versions of Celery (>3.1), there was a security issue with “deamonic processes are not allowed to have children”, for which an alternative fork of libnmap fixed the problem. Then we needed to return to Netdelta the process id of the running nmap port scanner process.

cd /opt
git clone https://github.com/pyoner/python-libnmap.git
cp ./python-libnmap/libnmap/process.py <virtualenv root>/lib/python3.x/site-packages/libnmap/

then patch libnmap to allow Netdelta to kill scanning processes

<netdelta_root>/scripts/fix-libnmap.bash

Change the environment variables to match your install and use the virtualenv name as a parameter

Database Setup

Create a database called netdetla and use whichever encoding snd collation you like.

CREATE DATABASE netdelta CHARACTER SET utf8 COLLATE utf8_general_ci;

Then from <netdelta root> with virtualenv engaged:

python manage.py makemigrations nd
python manage.py migrate

Web Server

I am assuming all you good security pros don’t want to use the development server? Well as you’re only dealing with port scan data then….your call. I’m assuming Apache as a production web server.

You will need to give Apache a stub web root and enable the wsgi module. For the latter i added this to apache2.conf – this gives you some control over the exact version of Python loaded.

LoadModule wsgi_module "/usr/lib/python3.7/site-packages/mod_wsgi/server/mod_wsgi-py37.cpython-37m-i386-linux-gnu.so"
WSGIPythonHome "/usr"

Under the DocumentRoot line in your apache config file, give the pointers for WSGI.

WSGIDaemonProcess <site> python-home=<virtualenv root> python-path=<netdelta root>  WSGIProcessGroup <site>  WSGIScriptAlias / <netdelta root>/netdelta/wsgi.py  Alias /static/ <netdelta root>/netdelta/

Note also you will need to adjust your wsgi.py under <netdelta root>/netdelta/ –

# Add the site-packages of the chosen virtualenv to work with site.addsitedir('<virtualenv root>/lib/python3.7/site-packages')

Celery

From the current shell
in …<virtualenv> ….under <netdelta root>

celery worker -E -A nd -n default -Q default --loglevel=info -B --logfile=<netdelta root>/logs/celery.log

Under systemd (you will almost certainly want to do this) with the root user. The script pointed to by systemd for

systemctl start celery

can have all the environment checking (this isn’t intended to be a tutorial in BASH scripting), but the core of it…

cd <netdelta root>
nohup $VIRTUALENV_DIR/bin/celery worker -E -A nd -n ${SITE} -Q ${SITE} --loglevel=info -B --logfile=${SITE_LOGS}/celery.log >/dev/null 2>&1 &

And then you can put together your own scripts for status, stop, restart.

Fintechs and Security – Part Two

  • Prologue – covers the overall challenge at a high level
  • Part One – Recruiting and Interviews
  • Part Two – Threat and Vulnerability Management – Application Security
  • Part Three – Threat and Vulnerability Management – Other Layers
  • Part Four – Logging
  • Part Five – Cryptography and Key Management, and Identity Management
  • Part Six – Trust (network controls, such as firewalls and proxies), and Resilience

Threat and Vulnerability Management (TVM) – Application Security

This part covers some high-level guider points related to the design of the application security side of TVM (Threat and Vulnerability Management), and the more common pitfalls that plague lots of organisations, not just fintechs. I won’t be covering different tools in the SAST or DAST space apart from one known-good. There are some decent SAST tools out there but none really stand out. The market is ever-changing. When i ask vendors to explain what they mean by [new acronym] what usually results is nothing, or a blast of obfuscation. So I’m not here to talk about specific vendor offerings, especially as the SAST challenge is so hard to get even close to right.

With vulnerability management in general, ${VENDOR} has succeeded in fouling the waters by claiming to be able to automate vulnerability management. This is nonsense. Vulnerability assessment can to some limited degree be automated with decent results, but vulnerability management cannot be automated.

The vulnerability management cycle has also been made more complicated by GRC folk who will present a diagram representing a cycle with 100 steps, when really its just assess –> deduce risk –> treat risk –> GOTO 1. The process is endless, and in the beginning it will be painful, but if handled without redundant theory, acronyms-for-the-sake-of-acronyms-for-the-same-concept-that-already-has-lots-of-acronyms, rebadging older concepts with a new name to make them seem revolutionary, or other common obfuscation techniques, it can be easily integrated as an operational process fairly quickly.

The Dawn Of Application Security

If you go back to the heady days of the late 90s, application security was a thing, it just wasn’t called “application security”. It was called penetration testing. Around the early 2000s, firewall configurations improved to the extent that in a pen test, you would only “see” port 80 and/or 443 exposing a web service on Apache, Internet Information Server, or iPlanet (those were the days – buffer overflow nirvana). So with other attack channels being closed from the perimeter perspective, more scrutiny was given to web-based services.

Attackers realised you can subvert user input by intercepting it with a proxy, modifying some fields, perhaps inject some SQL or HTML, and see output that perhaps you wouldn’t expect to see as part of the business goals of the online service.

At this point the “application security” world was formed and vulnerabilities were classified and given new names. The OWASP Top Ten was born, and the world has never been the same since.

SAST/DAST

More acronyms have been invented by ${VENDOR} since the early early pre-holocene days of appsec, supposedly representing “brand new” concepts such as SAST (Static Application Security Testing) and DAST (Dynamic Application Security Testing), which is the new equivalent of white box and black box testing respectively. The basic difference is about access to the source code. SAST is source code testing while DAST is an approach that will involve testing for OWASP type vulnerabilities while the software is running and accepting client connection requests.

The SAST scene is one that has been adopted by fintechs in more recent times. If you go back 15 years, you would struggle to find any real commercial interest in doing SAST – so if anyone ever tells you they have “20” or even “10” years of SAST experience, suggest they improve their creativity skills. The general feeling, not unjustified, was that for a large, complex application, assessing thousands of lines of source code at a vital organ/day couldn’t be justified.

SAST is more of a common requirement these days. Why is that? The rise of fintechs, whose business is solely about generation of applications, is one side of it, and fintechs can (and do) go bust if they suffer a breach. Also – ${VENDOR}s have responded to the changing Appsec landscape by offering “solutions”. To be fair, the offerings ARE better than 10 years ago, but it wouldn’t take much to better those Hello World scripts. No but seriously, SAST assessment tools are raved about by Gartner and other independent sources, and they ARE better than offerings from the Victorian era, but only in certain refined scenarios and with certain programming languages.

If it was possible to be able to comprehensively assess lots of source code for vulnerability and get accurate results, then theoretically DAST would be harder to justify as a business undertaking. But as it is, SAST + DAST, despite the extensive resources required to do this effectively, can be justified in some cases. In other cases it can be perfectly fine to just go with DAST. It’s unlikely ever going to be ok to just go with SAST because of the scale of the task with complex apps.

Another point here – i see some fintechs using more than one SAST tool, from different vendors. There’s usually not much to gain from this. Some tools are better with some programming languages than others, but there is nothing cast in stone or any kind of majority-view here. The costs of going with multiple vendors is likely going to be harder and harder to justify as time goes on.

Does Automated Vulnerability Assessment Help?

The problem of appsec is still too complex for decent returns from automation. Anyone who has ever done any manual testing for issues such as XSS knows the vast myriad of ways in which such issues can be manifested. The blackbox/blind/DAST scene is still not more than Burp, Dirbuster, but even then its mostly still manual testing with proxies. Don’t expect to cover all OWASP top 10 issues for a complex application that presents an admin plus a user interface, even in a two-week engagement with four analysts.

My preferred approach is still Fred Flinstone’y, but since the automation just isn’t there yet, maybe its the best approach? This needs to happen when an application is still in the conceptual white board architecture design phase, not a fully grown [insert Hipster-given-name], and it goes something like this: white board, application architect – zero in on the areas where data flows involve transactions with untrusted networks or users. Crpyto/key management is another area to zoom in on.

Web Application Firewall

The best thing about WAFs, is they only allow propagation of the most dangerous attacks. But seriously, WAF can help, and in some respects, given the above-mentioned challenges of automating code testing, you need all the help you can get, but you need to spend time teaching the WAF about your expected URL patterns and tuning it – this can be costly. A “dumb” default-configured WAF can probably catch drive-by type issues for public disclosed vulnerabilities as long as you keep it updated. A lot depends on your risk profile, but note that you don’t need a security engineer to install a WAF and leave it in default config. Pretty much anyone can do this. You _do_ need an experienced security engineer or two to properly understand an application and configure a WAF accordingly.

Python and Ruby – Web Application Frameworks

Web application frameworks such as Ruby on Rails (RoR) and Django are in common usage in fintechs, and are at least in some cases, developed with security in mind in that they do offer developers features that are on by default. For example, with Django, if you design a HTML form for user input, the server side will have been automagically configured with the validation on the server side, depending on the model field type. So an email address will be validated client and server-side as an email address. Most OWASP issues are the result of failures to validate user input on the server side.

Note also though that with Django you can still disable HTML tag filtering of user input with a “| safe” in the template. So it’s dangerous to assume that all user input is sanitised.

In Django Templates you will also see a CSRF token as a hidden form field if you include a Form object in your template.

The point here is – the root of all evil in appsec is server-side validation, and much of your server-side validation effort in development will be covered by default if you go with RoR or Django. That is not the end of the story though with appsec and Django/RoR apps. Vulnerability of the host OS and applications can be problematic, and it’s far from the case that use of either Django or RoR as a dev framework eliminates the need for DAST/SAST. However the effort will be significantly reduced as compared to the C/Java/PHP cases.

Wrap-up

Overall i don’t want to too take much time bleating about this topic because the take away is clear – you CAN take steps to address application security assessment automation and include the testing as part of your CI/CD pipeline, but don’t expect to catch all vulnerabilities or even half of what is likely an endless list.

Expect that you will be compromised and plan for it – this is cheaper than spending zillions (e.g. by going with multiple SAST tools as i’ve seen plenty of times) on solving an unsolvable problem – just don’t let an incident result in a costly breach. This is the purpose of security architecture and engineering. It’s more to deal with the consequences of an initial exploit of an application security fail, than to eliminate vulnerability.

Django and Celery – Two Sites, Single Host

Documenting this here because Celery’s documentation isn’t the best in general, but moreover because I hadn’t seen a write-up for this scenario – which I would imagine is not an uncommon situation.

So here’s the summarised scenario:

The challenge was to have 2+ Django sites on one VM without confusing the Celery backend. This requires the creation of a “Queue”, “Exchange”, and “Routing Key”. The Celery documentation gives major clues but doesn’t cover Django to any large degree. It does cover some first steps with Django, but nothing about deploying custom Queues in terms of Django python files and what goes where, or at least i couldn’t find it.

I’m sure there are many ways of achieving the same result but this is what worked for me…

The application won’t be able to find celery if you don’t initiate it. The project here is ‘netdelta’. Under the <app> dir create a file, say celery_app.py:

from __future__ import absolute_import, unicode_literals
import os
from celery import Celery
from kombu import Exchange, Queue


# set the default Django settings module for the 'celery' program.
os.environ.setdefault('DJANGO_SETTINGS_MODULE', 'netdelta.settings')

app = Celery('nd')

# Using a string here means the worker doesn't have to serialize
# the configuration object to child processes.
# - namespace='CELERY' means all celery-related configuration keys
#   should have a `CELERY_` prefix.
app.config_from_object('django.conf:settings')

# Load task modules from all registered Django app configs.
#app.autodiscover_tasks(lambda: settings.INSTALLED_APPS)

app.conf.task_queues = (
    Queue('cooler',  Exchange('cooler'),   routing_key='cooler'),
)
app.conf.task_default_queue = 'cooler'
app.conf.task_default_exchange_type = 'direct'
app.conf.task_default_routing_key = 'cooler'

@app.task(bind=True)
def debug_task(self):
    print('Request: {0!r}'.format(self.request))

Which is called when the project fires up with use of __init.py__ under <app> (‘nd’ in this case):

from __future__ import absolute_import, unicode_literals

# This will make sure the app is always imported when
# Django starts so that shared_task will use this app.
from .celery_app import app as celery_thang

__all__ = ('celery_thang',)

<django root>/<proj>/<proj>/settings.py is where the magic happens and it turns out to be a few lines. ‘scheduled_scan’ is the <proj>.tasks.<celery_job_name>:

CELERY_QUEUES = {"coller": {"exchange": "cooler",
                              "routing_key": "cooler"}}

CELERY_ROUTES = {
    'nd.tasks.scheduled_scan': {'queue': "cooler",
                                'exchange': "cooler",
                                'routing_key': "cooler"},
}

Now do the same for the other site(s).

Launch a worker thusly …

python manage.py celery worker -Q cooler -n cooler --loglevel=info -B
  • ‘cooler’ is the site name
  • ‘nd’ is the app name

The final step – your app.task has to call the custom queue you defined. In my case i could afford to set the default QUEUE to my wanted QUEUE because i had need for only one queue. But in multiple QUEUE scenarios, you will need to define the queue. I was setting jobs to run under a schedule using the djcelery admin panel that was created by default. The result are database entries – using an ‘INSERT’ statement to show the table structure (The queue, exchange, and routing key are highlighted):

INSERT INTO `djcelery_periodictask` (`id`, `name`, `task`, `args`, 
`kwargs`, `queue`, `exchange`, `routing_key`, `expires`, `enabled`, 
`last_run_at`, `total_run_count`, `date_changed`, `description`, 
`crontab_id`, `interval_id`) VALUES
(2, 'Linode-67257', 'nd.tasks.scheduled_scan', '["Linode"]', '{}', 
'coller', 'coller', 'coller', NULL, 1, 
'2017-10-15 23:40:00', 18, '2017-10-15 23:41:29', '', 2, NULL);


My virtualenv is as below (note i’m using the fork of libnmap that doesn’t use multiprocessor:

>pip list

  • amqp (2.2.2)
  • anyjson (0.3.3)
  • appdirs (1.4.3)
  • billiard (3.5.0.3)
  • celery (4.1.0)
  • Django (1.11.6)
  • django-celery-beat (1.0.1)
  • django-celery-results (1.0.1)
  • django-dajaxice (0.7)
  • html2text (2017.10.4)
  • iptools (0.6.1)
  • kombu (4.1.0)
  • MySQL-python (1.2.5)
  • netaddr (0.7.19)
  • packaging (16.8)
  • pip (9.0.1)
  • pyparsing (2.2.0)
  • python-libnmap (0.7.0)
  • pytz (2017.2)
  • setuptools (36.6.0)
  • six (1.11.0)
  • vine (1.1.4)
  • wheel (0.30.0)