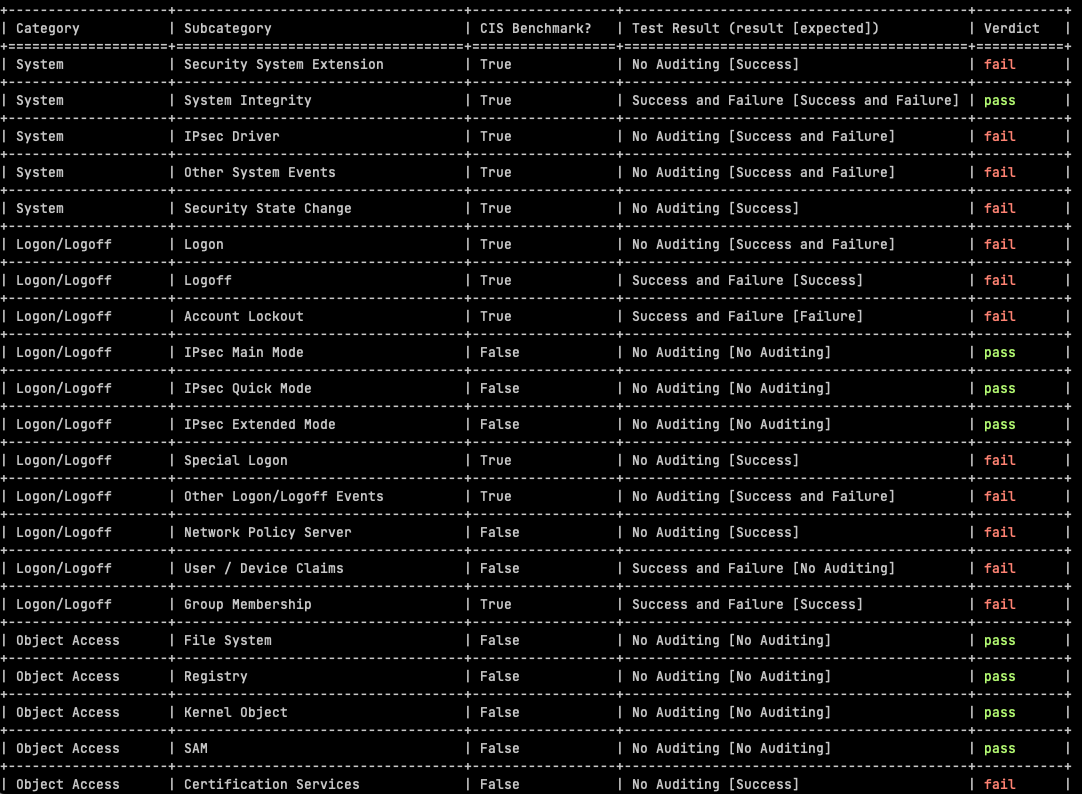
In the previous post on the subject of Windows SIEM, we covered the CIS benchmarks for Windows Auditing Policy in a spreadsheet, which was provided freely (really, actually free).
This week we introduce a python open source tool we have developed, to automate the CIS Benchmark testing.

Meeting Regulatory / Compliance / Audit Requirements
The automated assessment results from AuditpolCIS, as it’s based on CIS Benchmarks, helps in the support of meeting audit requirements for a number of programs, not least PCI-DSS:
- Audit account logon events: Helps in monitoring and logging all attempts to authenticate user credentials (PCI-DSS Requirement 10.2.4).
- Audit object access: Monitors access to objects like files, folders, and registry keys that store cardholder data (PCI-DSS Requirement 10.2.1).
- Audit privilege use: Logs any event where a user exercises a user right or privilege (PCI-DSS Requirement 10.2.2).
- Local log files sizes and retention policies are useful in assessing compliance with e.g. 5.3.4 and 10.5.1 requirements (PCI-DSS 4). There should be a block of text after the audit policy results.
Usage / Setup
First you will to set up a Python Virtual Environment. Ensure that you have Python installed on your system (Python 3.10 was used in development). If not, download and install Python from the official website: https://www.python.org/downloads/
Open a Command Prompt or terminal window and navigate to the folder where you extracted the AuditpolCIS project.
Run the following command to create a new virtual environment:
python -m venv venvActivate the virtual environment by running:
For Windows:
venv\Scripts\activateFor macOS/Linux:
source venv/bin/activateInstall the required Python packages from the requirements.txt file by running:
pip install -r requirements.txtYou will need a .env file in your project root. The contents relate to the target you wish to test:
HOSTNAME='<Windows box IP address or host name>'
USERNAME='<Windows user account name>'
PASSWORD='<account password>'
Make sure to assign the right ownership and permission on .env. Usually the permissions will be 600.
Once the virtualenv is enabled, you can run the code:
Feel free to branch or submit a PR.
Additional Points
The CIS benchmarks are based on Windows 2019 Server but they apply to other target varients on a Windows theme. I know none of you will have EOL Windows versions. <Sarcasm engaged>I mean in 22 years of consulting, i’ve never seen any out-of-support warez in critical business usage</Sarcasm engaged>.
Powershell is not required on the target but use of Powershell is also not a crime. Yes, that was a security person who said that.
Sustainability / Use of Regex
I had to use some fairly snazzy regex to pull out Categories (category_pattern = r'^(\w+.*?)(\r)?$') and Subcategories (subcategory_pattern = r'^( {2})([^ ]+.*?)(?=\s{3,})(.*\S)') from the auditpol command output. I did look at more sustainable ways of achieving the same goal, although admittedly i didn’t spend much time doing that. One thing has been clear for a long time with Windows – don’t go looking for registry keys because that can be very painful. Not only is documentation for a key location somewhat thin and erroneous, the key loation also often changes across Windows versions. ChatGPT‘s lack of knowledge of Windows reg keys bears testimony to the previous comments.
So there are two sources of Subcategory names – there is cis-benchmarks.yaml and there is the output of the auditpol /get /category:* command. If there are entries in the YAML file which are not in the auditpol output, they are flagged in the script output, and the same is true vice versa. So if you make spelling mistakes in the excel sheet or YAML file, it will be flagged. It can also happen that auditpol output subcategories do not reflect the CIS Benchmarks subcategories, perhaps with different Windows versions as targets. Any of these categories will be flagged by the script and listed below the pass/fail results.
If you want to change the verdicts or [Sub]Category names, you are of course free to do so. You can edit the cis-benchmarks.yaml file, or edit the included spreadsheet, followed by running the included genyaml.py.
Connection Method
The scripts works over SSH because other types of connection are a pain in the derriere and require you to radically increase your attack surface area, but if there’s a request for e.g. WinRM, please do let me know, or send out a Pull Request. Follow this link for more information about enabling the built-in SSH for Windows.
I know use of AutoAddPolicy with Paramiko in Python is not good form, but also assume that as an admin in the position of someone who performs daily tasks using administrative rights, that you know your hosts. Sometimes security people do get in the way of progress, when there’s low risk issues afoot. Use of RejectPolicy instead of auto-add would be one such case.
Tests Rationalisation
Some of the tests included are not a CIS Benchmark (out of 59 tests, 32 are CIS Benchmarks, whereas 27 are not). It’s not clear why the subcategories were omitted by CIS but anyway – in these cases we have made an assessment based on logging events volume for this subcategory, versus the security value of the subcategory. Most of these are just noise, and in many cases, very high volume noise, so we have advised “No Auditing”.
Customising Test Criteria
The testing template is formed of the YAML file cis-benchmarks.yaml. If you prefer to make changes to the testing template with Excel, the sheet is CIS-Audit-Reqs-Windows2019Server.xlsx in the code root. You can then use the python script genyaml.py to generate a new YAML file (you will need to use the right virtualenv, see above for usage instructions).
